 Entrance
Ready khinkali how to cook in boiling water. Flavors of Georgia! Khinkali in a double boiler - cooking time and recipes
Khinkali is a very popular Georgian dish. It is loved and often cooked all over the world. It is customary to boil them immediately before eating. If the hostess plans to cook for the future, then the only way to store it is to freeze.
Home cooking vs store-bought khinkali
Traditionally, it is believed that purchased products are inferior in quality to those that are lovingly prepared at home. The modern pace of life and workload do not always allow you to devote time to culinary masterpieces. Under any circumstances, the method of how to cook khinkali is almost the same for store-bought and homemade semi-finished products.
Store-bought options are of very decent quality, but often contain less minced meat, and their dough is thicker. Because of this, they cook for 2-3 minutes longer than homemade ones.
traditional cooking
For Georgians, the only correct way to cook their favorite dish is to boil khinkali in boiling water. There are many popular videos on the Internet about traditional Tbilisi khinkal, where there are huge vats with national dishes boiled in them. At home, under normal conditions, you can use a saucepan for cooking.
It is desirable that it be capacious, roomy. Step-by-step instructions on how to properly cook khinkali in a saucepan:
- The widest dishes are selected so that during the cooking process khinkali can swim in it at a small distance from each other;
- The pan is filled 2/3 with water and placed on maximum heat;
- Water is salted to taste, which gives the dough of the finished dish greater elasticity;
- For flavor, bay leaves and a few peas of allspice black pepper are added to the water;
- Khinkali are carefully lowered into boiling water one at a time, holding them by their tails;
- An important point - you need to stir during the cooking process to prevent sticking. The moment of readiness is expected;
- After 10-15 minutes, the khinkal should emerge. This means that they are cooked;
- With the help of a slotted spoon (or a wooden spatula), the finished khinkali are carefully removed from the pan and laid out on a flat dish.
The taste of ready-made khinkali is not affected by the fact whether they were fresh or frozen before entering the pan. The answer to the question of how much to cook frozen khinkaliprost: the cooking time is the same - 10-15 minutes after boiling and surfacing.
Topping matters
There are many recipes for this dish. The main variations are on a theme. How long it takes to cook khinkali in boiling water depends on the internal content. Traditionally, meat (beef and pork in equal proportions), herbs, spices and water are added inside. Minced meat can be scrolled through a meat grinder or chopped. In the first version, the cooking time is from 10 to 12 minutes, and in the second, up to 15 minutes.
Sometimes cheese and mushrooms are used as a filling. To boil the latter, it will take less time - up to 7-10 minutes.
Do not cook them in boiling water for too long. This can cause the dough to become overcooked.
Alternative Ways to Cook Georgian Khinkali
The art of cooking knows no boundaries. On the Internet there are descriptions of how to boil semi-finished products even in the microwave. This approach is highly questionable. If there is no gas or electric oven in the house, you can resort to this cooking method, but expectations are unlikely to come true.
You can cook a Georgian dish both in a slow cooker and in a pressure cooker. The principle is the same: the state of readiness comes under the influence of hot steam. Khinkali in a slow cooker is very easy to cook:
- Pour clean, cold water into the bowl. The volume depends on the number of pieces: for one unit - 1/2 cup of liquid.
- The grate or stand must be lubricated with oil (both butter and sunflower are used);
- Khinkali is placed on the surface of the grid (stand) so that they do not stick to each other;
- The corresponding mode is set, and the container is closed with a lid until it is fully cooked;
- After 30 minutes of waiting, the dish is ready.
True lovers of traditional Georgian cuisine do not accept steamed khinkali. This method is best suited for similar but different dishes. It has long been customary to cook Kazakh manti with the help of steam. Their dough is made thinner than in the Georgian dish, and the bag of dough enveloping the filling is open.
With this method, the khinkali dough becomes dense, and the dish itself loses its juiciness. It is juiciness that is one of the main criteria for a well-cooked Georgian dish.
Traditions of serving food on the table
This food, according to a long established custom, is eaten with the hands, holding each piece by the tail. The bag of dough is carefully bitten to drink the broth inside. Then they eat the dough itself with the filling. Tails are usually left on a plate.

Khinkali is a well-known traditional dish from Georgia, many buyers like to cook on their own or buy in the form of a frozen semi-finished product, so in this article we will consider how much time and how to cook khinkali in water in a saucepan and steam in a slow cooker so that they turn out tasty, juicy and cooked until fully cooked.
How long to cook khinkali?
Unlike ordinary dumplings, khinkali are often larger in size, while their filling may not contain ordinary minced meat, but minced meat, which takes longer to cook, so let's take a closer look at how much to cook khinkali in various ways:
- How long to cook frozen khinkali in a saucepan? Frozen khinkali are boiled for 10-15 minutes after boiling water in a saucepan (put them in boiling water). On average, khinkali is cooked for 10 minutes with ordinary minced meat inside and 13-15 minutes with minced meat inside.
- How many minutes to cook only molded khinkali in a saucepan? Fresh, only stuck together homemade khinkali should be boiled for 10-13 minutes after being placed in boiled water in a saucepan.
- How long does it take to cook khinkali in a slow cooker? In a slow cooker in the “Steaming” mode, khinkali is cooked on average for 30 minutes.
Having learned how much time to cook khinkali, we will consider further what is the sequence of their preparation in a saucepan and a slow cooker.
How to cook frozen khinkali in a saucepan?
- Ingredients: khinkali, water, salt.
- Total cooking time: 15 minutes, preparation time: 5 minutes, cooking time: 10 minutes.
- Calories: 235 calories (per 100 grams of product).
- Cuisine: Georgian. Type of dish: Main course. Servings: 2.
Regardless of which khinkali will be prepared (bought store-bought or home-made ones), the process of their cooking takes place in the same sequence. Consider step by step how to cook khinkali in a saucepan at home:
- We choose a pan of a suitable size (the pan should be voluminous and with a wide bottom), pour cold water into it (on average, half or 2/3 of the volume of the pan) and bring to a boil over high heat. After boiling water, add salt to taste.
- We divide the khinkali into portions (both frozen and home-made only), as they should be boiled in a small amount so that they do not stick to each other and can evenly boil.
- We lower the khinkali one by one into boiling water, while lowering them manually, holding the tail and slowly rotating it in the water so that the dough has time to weld a little and eventually does not stick to the bottom and walls of the pan (this method is most relevant to home-made only khinkali).
- Cook khinkali for an average of 10-15 minutes until cooked, and after boiling the water again, gently stir them so as not to damage the dough and reduce the heat (the water in the pan should not boil much).
- We carefully take out the cooked khinkali with a wooden spoon on a plate, add butter and ground black pepper, wait until they cool down a bit and eat. Enjoy your meal!
Note: boiled khinkali are traditionally eaten with hands, holding them by the tail, while if the dough tail itself is hard, you can not eat it, but put it on the edge of the plate.
How to cook khinkali in a slow cooker for a couple?
No less tasty you can cook khinkali in a slow cooker for a couple, while the process of cooking them is quite simple:
- Lubricate a special bowl for steaming in a slow cooker with butter and put khinkali (frozen or homemade) on it at a distance of 1-2 cm from each other.
- Pour water into the multicooker and put a stand with khinkali on top, set the “Steaming” mode and the cooking time for 30 minutes.
- After the beep, we take out the steamed khinkali and put them on a plate, add butter and ground black pepper.
In conclusion to the article, it can be noted that knowing how to cook khinkali (frozen and homemade) correctly and how much after boiling water in a saucepan or steamed in a slow cooker, you can cook a tasty and juicy dish that you and your family will really like. We leave our feedback and useful tips, how many minutes and how to cook khinkali properly, in the comments to this article and share it on social networks if it was useful to you.
Tender dough, fragrant hearty meat and spicy broth inside are real Georgian khinkali. You can cook them yourself at home or buy them from the store. How to cook khinkali correctly so that they are juicy inside and at the same time retain their shape, do not boil?

in a saucepan
The most accessible method of cooking a Georgian dish is on the stove.
Cooking steps:
- Pour cold water into the container, leaving 1/3 of the free volume.
- Bring the liquid to a boil over high heat, then season with salt.
- Send the khinkali into the water one at a time. Lowering, hold the product by the tail and twist it a little in boiling water, forming a funnel. This will prevent the product from quickly falling to the bottom and sticking to it.
- Gently mix the khinkali. Boil them in small portions: so they do not stick to each other, boil well.
- After boiling, reduce the heat a little: the water in the pan should boil, but not too intense.
- After surfacing, remove the products with a slotted spoon.
Pour the finished dish with melted butter, sprinkle with black pepper and serve.
In a double boiler
Steamed khinkali are not only tasty and healthy, but also juicy. Thanks to this cooking, their juice does not flow out, but remains inside.
Cooking in a steamer:
- Pour the required amount of water into the container of the device. Use boiling water to speed up cooking.
- Lubricate a special grate with butter or vegetable oil and lay out the khinkali in 1 layer. They must not touch each other.
- Turn on the device and set the timer.
- After the recommended time has elapsed, check the dish for readiness.
In a slow cooker
Tasty khinkali are prepared by the following method:
- Pour 0.5 liters of water into the bowl of the appliance.
- Lubricate the steam container with butter, put khinkali at a distance of 1-2 cm from each other.
- Turn on the "steaming" mode and set the timer.
- Carefully place the finished dish on a plate and season with oil.

In a slow cooker, cook khinkali in the "steam cooking" mode.
In a pressure cooker
In this special device for preparing traditional Asian dishes, cooking khinkali is easy and simple.
- Lubricate the bottom of the pressure cooker with butter or vegetable oil.
- Lay out the products, leaving at least 1 cm between them.
- Place the tool on a smaller saucepan over boiling water.
- Cook the dish under the lid until cooked.
in the microwave
Cooking steps:
- Pour a glass of water into a deep glass or special container for the device and salt it.
- Place the khinkali in the container.
- Cook food covered. If you do not have special dishes, cover the bowl with a regular plate.
- Turn on the microwave at 800 W and set the cooking time.
- After the signal, check the khinkali for readiness.
How much to cook
Cooking time depends on the following factors:
- method of preparing the product: fresh products will cook faster than frozen ones;
- filling: pork, beef or lamb;
- grinding method: minced meat or minced meat;
- cooking method.
Homemade and store-bought khinkali cook for almost the same time.
It's important to know:
- Khinkali require enough free space, so take a large pot with a wide bottom and high walls for cooking.
- If the filling is minced meat, cook such products for a few minutes longer.
- To prevent khinkali from sticking together after cooking, rinse them with cold water.
- Before serving, pour the dish with butter and sprinkle with black pepper or other spices to taste.
- When serving, use dogwood sauce, satsebeli, tkemali, sour cream.
- Cooked khinkali are eaten with hands, holding them by the tail. If the dough tail itself is hard, do not eat it, but put it on the edge of the plate.
- The finished product spoils quickly. Cook khinkali for one meal.
Many people use this dish as an alternative to dumplings, because in this case it takes less time to mold and cook. Knowing how to cook khinkali correctly and how much, skillful housewives will always be able to please themselves and their loved ones with this hearty Georgian dish.
Khinkali has gained great popularity due to its exquisite taste and appetizing appearance. This versatile dish can be considered both the second and the first, thanks to the presence of a fragrant rich broth. Many probably know how to cook khinkali and most likely have already tried to cook them at home. But most do not know how much to cook khinkali so that they remain juicy and the dough does not fall apart from prolonged cooking.
Khinkali is prepared in a saucepan by boiling or steaming. When cooking, it is important to know a few nuances:
- You need to lower the product into a spinning funnel, you can create it with a slotted spoon, or by grabbing the product itself by the tail;
- Khinkali is boiled in one row to avoid sticking;
- When cooking, it is important that the water boils intensively, this will prevent the product from sinking to the bottom and sticking to it;
- When khinkali float up, you can safely get them with a slotted spoon. On average, it takes 12-13 minutes to cook.
Steamed khinkali takes about the same time to cook as in a saucepan. The main thing is to carefully lay them on the grill so that they do not stick to each other.
The cooking time for homemade and industrial products does not differ, so if you know how much to cook khinkali from the store, there will be no difficulties with homemade products. You can serve the finished dish with herbs, spices, sour cream or mayonnaise, and khinkali with sweet fillings are sprinkled with honey.
Good day everyone! Which of you loves Georgian cuisine, admit it? I am not averse to pampering myself and my beloved and unique household members with juicy and magnificent meat beauties, which are called quite funny like khinkali. In our family, we always make them with meat, but more))).
In fact, as I know, the recipe for khinkali resembles our amazingly delicious ones, they don’t look like them outwardly, but in taste ... they resemble something, but they are juicier. What do you think, share your opinion. What do you prefer?
I want to remind you that this dish still comes from Georgia, but now it has become quite popular and it is cooked almost everywhere.
Ready-made frozen semi-finished products are quite often found on store shelves. To be honest, I never even look at them, because it’s scary what stuffing they are made of, I’m used to doing everything the old fashioned way, myself). How do you usually cook?
Of course, in order to cook the best and most delicious khinkali, you need to know how to knead the dough properly and how to make a juicy meat filling.
There are quite a variety of dough recipes. But I want to introduce you to a truly Georgian way of kneading. Although, I myself often add a couple of tablespoons of vegetable oil to such a dough so that it becomes elastic and elastic. After all, the appearance of these funny Georgian dumplings will subsequently depend on this.
Well, let's learn this tricky business))). This is a fairly common option, even without eggs, other interpretations will be given further, so experiment, find your favorite for yourself.
We will need:
- flour - 4 tbsp.
- water - 2 tbsp.
- vegetable oil - 4 tbsp. l can be without it, but I recommend adding
- salt - a pinch
Cooking method:
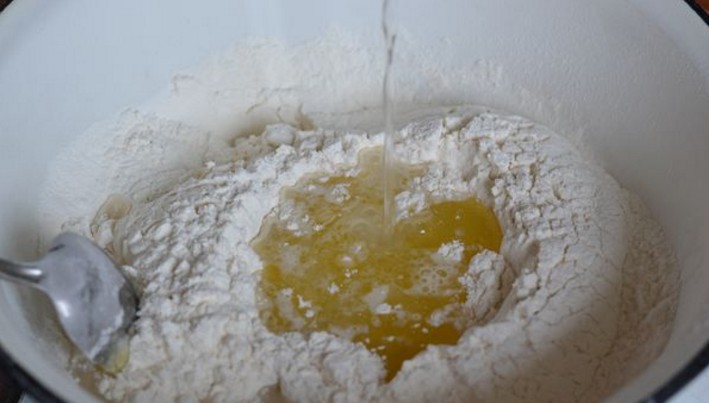
1. Start by choosing your flour first, it is best to buy the highest grade. But, it’s also suitable for general consumption, I usually take this one, it fits perfectly. So, in order to saturate the flour with oxygen, sift it through a sieve several times.

Gently and slowly begin to knead with a spoon. It is not difficult at all to do this, at first the mass will seem liquid, and then it will get thicker and thicker.
Important! Don't forget to add salt when you add vegetable oil.
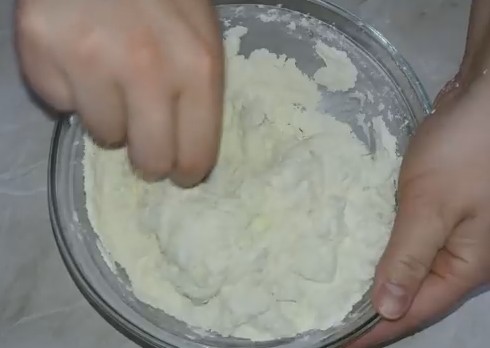
After kneading, you must, I repeat, be sure to leave the dough to rest. Cover it with a kitchen towel or large container and let it sit for 40 minutes. If you don't, the dough will not be elastic.
3. And now he is such a playful ball ready to go, as they say, take it and do it.

Khinkali filling
So, our dough is ready, it remains to make the filling, these are usually finely chopped pieces of beef or lamb meat. In this picture you see pieces of meat, you will need to chop them even three times less.

Or you will go the other way and do nothing else. In Russia, such a filling as minced meat has taken root. And what, you can do it pretty quickly and easily if you have an electric meat grinder at hand, or you can buy it ready-made in the store.
But, of course, the secret is that you should put as many onions as possible into the filling, which can also be chopped into cubes.
And you can grate on a coarse grater. The smell will be chic, and so that there are no tears, be sure to put the onion in the refrigerator beforehand.

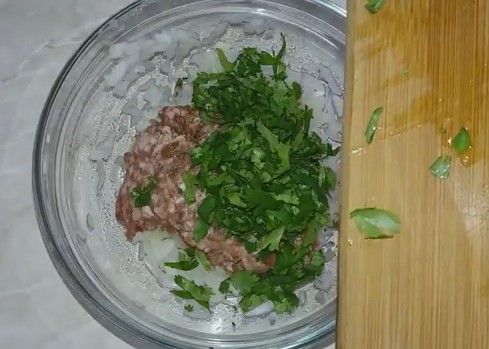
If desired, you can add any finely chopped greens, such as parsley or cilantro. As well as chopped or passed through a press garlic. Do not forget also about seasonings for meat and black ground allspice.
I also want to tell you to make the dish even juicier and more tender, water or milk is added to the minced meat and stirred, the filling becomes quite thin, but I don’t advise beginners and beginners to do this, otherwise you won’t be able to sculpt. The first time, add quite a bit of liquid.
How beautiful to sculpt khinkali at home?
Now, as they say, it's up to the small. Take it and do it, do you think it's easy? Of course! There is nothing difficult in this, especially since these are not homemade dumplings, where they are molded in small form, then the work will go faster, and when you blind a dozen, you will generally blurt them out and tell everyone that typ-blup and ready .
The stages of work will be as follows, you first need to make a sausage from the dough, and then cut it into pieces with a sharp knife.

Each such piece will need to be rolled in flour, and then, using a rolling pin, roll it into a round cake.

Well, then the fun begins. But there is one more option for rolling out the dough, because if you are waiting for guests, and your hand is not full yet, then your meat dumplings may turn out to be not the same size, but you still want ideality. Therefore, you can roll out a large cake from the whole dough on a table sprinkled with flour and make circles using a glass or a special form.
Important! The thickness of the cakes should be 1-2 mm.

And then, of course, for each such circle, put a spoonful of meat or minced meat and decorate. Do not put too much meat filling, because then little juice will stand out, and all the charm is in the juice of this dish.
Well, look at the modeling process itself step by step, put the filling in the very center of the circle of dough, then, moving in a circle clockwise, start making tucks, like this:

Do not forget to pinch the top, although you can not do this if you are going to steam, and not in a saucepan. You can also make them completely open, like here))).

Many Russians make them in the form of bags, of course it looks great, and it’s just amazing, it’s a pleasure to eat such. To create such bags, you need to make more circles, and put a little less filling, in general, adapt when you start cooking and find your very ideal modeling option for yourself.

You need to lay ready-made semi-finished products on a tray or board, sprinkling it evenly with flour. And then immediately cook or you can freeze in the freezer, and then place them in a bag.
How to cook khinkali in a saucepan?
After you have blinded the khinkali, it remains to do the most important thing, cook them, and then eat them.
If you really like to make such culinary masterpieces, then be prepared for the fact that your household will be very happy about this. Mine just love to eat everything meat, for example, and.
I usually, when I cook meat beauties, I cook a whole mountain of them, if not to call it a bunch. Immediately my most important assistant and taster comes to my aid. The second taster was in the garden, so he did not get into the frame.

Well, let's figure out how to properly cook them. The most important thing is to cook the broth correctly, pour water into the pan and put it on fire. Bring to a boil and salt to your taste. The water should be slightly salty.
Add a couple of leaves of parsley, peppercorns 4-5 pcs., Your favorite spices for meat and cumin into it. Although personally I don’t add anything other than lavrushka and salt.

Then note for about 2-3 minutes, and then remove the bay leaves, if you do not, they will add bitterness to the dish.
Now get ready, take the khinkali and dip them into the boiling broth. But how to do it right? It turns out that it is necessary, if you follow Georgian traditions, namely, you must make a funnel with a spoon clockwise and only after that throw one at a time and stir the khinkali each time so that they constantly spin, as if it were a tornado.
After the water boils again after lowering, cook for 7 minutes. And then put on a dish, grease with butter so that they do not stick together and serve with any sauce, or with ketchup.
Real khinkali in Georgian
Well, now let's make the traditional recipe, which many simply adore. I hope that this option will become your favorite and thanks to it you will cook tasty and simple, and most importantly satisfying. One of the best and classiest recipes for your lunch or dinner table.
We will need:
- Wheat flour - 500 g
- Water - 300 ml
- Salt - 1.5 tsp
- Beef - 500 g
- Salo - 100 g
- Onion - 2 pcs.
- Garlic - 2 cloves
- Cumin (zira) ground - to taste
- Red chili pepper - a pinch
- Cilantro (coriander) - to taste
Cooking method:
1. Start preparing this dish by preparing the filling. To do this, chop the beef very finely into pieces with a sharp knife, and lard too, it is it that will give great juiciness. If you do not have fat, then you can easily replace it with pork. Salt and pepper to taste. And also add cilantro, zira and red pepper to taste.

Do not forget also about onions and garlic, chop as little as possible and add to the filling, stir well, add quite a bit of water so that there is juice inside the khinkali.
2. Now form the dough, for this, mix the flour with water and add 1.5 tablespoons of salt. The dough should turn out to be quite steep and dense, because the filling for khinkaliki will be quite watery, and if the dough is not the right consistency, nothing will come of it.

The main thing is correct, as it is written in the list of products, see the proportions. After kneading, the dough should lie down a bit and rest, at least 20 minutes, at best 40 minutes. Then knead it again with your hands, and then make small circles in any convenient way. Roll them out quite thinly, about 1-2 mm.
3. With a small ladle, scoop up the meat filling and put it in the middle of the cake.

4. Now make a bag, take your time, if you forgot how to do it, go up above this note and see the work steps.

5. Well, then you should boil such handsome men in a saucepan, salt the water to taste.

Wait for the moment of boiling and only after that throw the khinkali into the water and cook after boiling for 6-7 minutes.
6. Serve with freshly ground pepper or tomato sauce. Eat for health!

Classic recipe for khinkali with lamb
Now let's take the next option with lamb, and this video will come to the rescue, in which the chef will skillfully and quickly tell us about all the intricacies of sculpting and cooking this dish:
Homemade khinkali with meat
There is nothing more beautiful if you make this dish with your own hands. As they say, your homemade ones are always more tender and tastier, and most importantly, more useful than store-bought ones. After all, it is not known what they are made of and how and where they are stored. So take care of yourself and your family, cook yourself.
We will need:
- beef - 500 g
- flour - 2-3 tbsp.
- salt - 0.5 tsp
- cold water - 1 tbsp.
- onion - 1 pc.
- cilantro or other herbs to taste
- ground black pepper
- chilli
We will need:
1. Place flour, water and salt in a bowl and mix these three ingredients thoroughly. Cover and let stand 25 minutes.

2. In the meantime, take care of the filling. Wash the beef, remove all the films and chop very finely into pieces in the form of small cubes. Then chop the onion, cilantro and red chilli. Add all these spices and vegetables to the meat.

Salt and pepper to your liking. Pour in some water and stir again. The filling turned out quite juicy and beautiful.
3. Now, as for the dough, remember it on the table with your hands, and then cut it into equal pieces.

It is from each such piece, roll it in flour, make thin circles.
4. Take a tablespoon and put the filling.

5. And then, moving in a circle, collect the dough in the form of an accordion to make a kind of bag, which is inherent only in real khinkals.

6. Then tear off the top and pinch nicely.


Serve with a good mood and any sauce or, for example, with
Khinkali beef and pork
Now I suggest you make khinkali from mixed minced meat, it turns out moderately fat and juicy. But, we Russians like this option, because we are used to making our Russians with just such stuffing. The composition of minced meat and its components will be written in the list of products.
So cook them so that they turn out juicy and tasty, as if you were in the best restaurant.
We will need:
Dough:
- flour - 400 g
- cold water - 180 ml
- salt - 0.25 tsp
Filling:
- minced meat - 300 g
- bulb - 1 pc.
- fresh cilantro - 1 bunch
- zira - 1 tsp
- cold water - 100 ml
- salt, pepper - to taste
Cooking method:
1. So, prepare all the ingredients according to the list for the test. Take a glass of water and add salt to it. Stir.

Pour all the flour into a bowl and pour water, stir with a tablespoon. Thus, you should get a tight dough, or rather thick.
Important! At first, it will seem to you that it is watery, but over time it will become tight. You just need to mix everything thoroughly, first with a tablespoon, and then put the dough on the table and knead with your hands.
The filling will be quite liquid and juicy, which is why we make just such a tight dough.
2. After that, the dough must lie down and rest for 40 minutes. You can use a plastic food bag so that it does not dry out or cover with any deep cup.

3. Add chopped onion, pepper, cilantro and zira to the minced meat. Zira and onions will first need to be rubbed with your hands so that the juice stands out, this will add more flavor to the finished dish. Stir and salt. Add half a glass of water, due to it you will get the most delicious juice during the cooking process.
Important! If you do not have ready-made minced meat, you can make it yourself, for this, twist the pieces of meat in a meat grinder.
You can check the minced meat for density, if you stick a spoon into the minced meat, then it should fall, this should be the consistency.
4. After the dough has rested, you need to knead it again on the table with flour, and only after that, start rolling it into a large cake 1-2 mm thick, use a cup to make circles. Or just make a sausage and cut it into 10 balls, and then roll them out with a rolling pin. Then put a spoonful of filling in each.

And start in a circle clockwise to make an accordion in the form of folds. The more folds you get, the more expressive the dish will be. The very top, if it turned out to be too large for you, can be cut off with culinary scissors.
5. Next, throw the finished khinkali into boiling water and cook until tender for about 7-10 minutes. Then pry with a slotted spoon and put to cool on a plate, pour with melted butter and crush with ground pepper. Enjoy your meal!

If you have khinkali left for the next day, you have not mastered them all, then you can easily fry them in a pan, they will be fried with a beautiful crust, or heated in the microwave.
Cooking frozen semi-finished products for a couple in a Redmond or Polaris slow cooker
You can cook khinkali differently, not in a saucepan, but this is done very simply, for example, in a slow cooker or a double boiler. You just need a special mold, which is usually included in modern multi-helpers.
I want to show you the cooking process in Redmond or Polaris, why exactly in them? Yes, because, firstly, I have them at home, and secondly, these brands are the most popular among housewives. In other models, the principle of operation is the same, so if you have a different brand, the main thing is to select the Steam cooking mode and cook to your health.
Cooking method:
1. Pre-frozen semi-finished products do not need to be thawed, put them on a leaf. Just as shown in this photo.

2. Then place this cup with holes in a slow cooker, but do not forget that you first need to pour 1/4 of water into the bowl, then cover with a lid.

3. Dial the desired Steam mode and turn on for 1 hour.

4. Well, then put it on a plate and enjoy the taste and beauty, decorate with dill and make some kind of salad.

If you have Panosonic, then use this video, I hope everything will become completely clear to you, there should be no difficulties:
That's all for me. Create and create all sorts of masterpieces. As always, I say goodbye to you and say see you soon! Bye-bye everyone!