 Entrance
How to pickle pike caviar at home. Delicious recipes for salting pike caviar at home
Raise chickens and constantly face their slaughter, plucking and other not very pleasant things? Do you know what quality chicken meat depends on how well you process the carcass? Not?! Then all about how to gut and how to cut a chicken correctly, read further in the article and watch thematic photos and videos.
What comes before cutting?
Chicken cutting implies the final division of the bird carcass into portioned pieces. Depending on the size of the pieces you need, two methods can be distinguished. According to the first method, it is necessary to cut it economically into smaller pieces, and in the common people it is called "waste-free". The second method is cutting the chicken into equal parts. Both methods will be discussed step by step in the diagram, photo and video later in the article.
And now let's talk about the stages that precede the chicken cutting, namely, slaughter, plucking and gutting the carcass. The methods of slaughter and plucking will be discussed in other articles. But we still remember the main nuance that will facilitate all further work. So, the most important thing is the correct preparation of the bird for slaughter, namely a strict diet, at least half a day. Then the goiter and cloaca of the chicken will be emptied and there will be no extra fuss with them during gutting.
gutting
So, we have a killed and plucked chicken, which must be butchered, and for this it must first be gutted. All you need is the knowledge of what and how to do, a sharp knife and smooth hands. If you're not sure you can handle it, don't take it. Since in case of damage to the intestines or something else, you risk spoiling delicious chicken meat. Below is a short video on how to gut a chicken at home.
- First you need to cut the anus. To do this, take a knife and cut it in a circle. The main thing is not to pierce anything superfluous.
- Now we make a shallow incision from the excised anus to the keel of the bird. Again, the main thing is not to hurt the intestines. If you are afraid to hurt, then the skin can only be cut near the anus towards the keel, after which it will easily tear further with your hands.
- Now we are preparing dishes for waste and internal organs.
- Carefully listen to the intestines and anus. At the same time, we cut out the stomach and liver. With the liver, you also need to be very careful not to hurt the spleen. We remove it from the already cut liver.
- Now you need to draw out the goiter. If you prepared the chicken for slaughter correctly, then the goiter will be empty and pulling it out will not be a problem. Otherwise, before gutting, we cut the skin on the neck and empty the bird's crop. You also need to cut the skin if the crop does not want to be pulled out or when using a slaughter method that does not involve cutting off the head.
- Now you can cut out the genitals (ovaries in hens or testes in cockerels) and the heart.
- The final stage of gutting will be a thorough washing of the carcass cold water.
How to disassemble a bird?
If you don't know how to properly butcher a chicken, then, as mentioned above, two methods are great for this. Both the first and the second method, chicken cutting will not pose any difficulties when it is carried out at home. As for which option to choose for you, we cannot advise anything here. Both methods are good and fast to implement, so give preference to yourself, and below are the cutting diagrams for both options.
Option one
This method will allow you to quickly and economically cut a whole chicken carcass into pieces. At the same time, the work is easy to carry out at home with an ordinary kitchen knife. Further detailed description process with thematic photos and videos.
- First, separate the legs of the chicken. To do this, we put the carcass on the back, pull the leg and cut the skin between it and the body. As soon as you reach the joint, you need to stop, take the leg with one hand and turn the joint outward. Next, we separate it with a knife and completely cut off the leg. We do the same with the second leg.
- Now we divide each leg into two parts: lower leg and thigh. We put the leg with the skin on the table and separate it along the flexion joint with a sharp pressure of the knife. We do the same with the second leg.
- Cut off the wings at the shoulder joint.
- Next, you need to cut the carcass into breast and back. To do this, we put the knife inside the carcass and pierce it. Now, slowly, towards ourselves, parallel to the spine, we divide the carcass in half.
- Now we completely separate the back from the breast. Then additionally cut the back and breast in half.
Option two
This method will come in handy if you need to cut a whole chicken into pieces that are approximately even in terms of the amount of meat. It is also easy to implement at home with improvised means, and thematic photos and videos will help you with this.
- First you need to prepare for cutting the legs. To do this, on the back of the chicken, below the scapular bones, we make incisions. Then on both sides along the ridge towards the tail we make 2 more cuts. This will help us to easily remove the meat from the bone, which is called "oyster".
- Bones - "oysters" are located in small depressions along the ridge from the back. Carefully separate them with a knife. When they stick to the skin alone, cut off the legs.
- The legs are cut out, as in the first version, but in addition, the “oyster” is captured.
- Let's start cutting out the wings. To do this, turn the carcass upside down and make an incision between the spine and one of the shoulder blades. Now the shoulder blade is separated, and then everything is repeated with the second wing. Upon completion, the spine is completely separated.
- At this stage, you need to separate the breast and wings from the skeleton. To do this, cut the carcass from the inside along the spine.
- Now we cut off the wings from the breast so that we get 3 equal pieces - 2 wings and a piece of breast.
The final step in any cutting method is a thorough washing of the resulting parts. Such chicken disassembly options are basic. But no one forbade you to come up with your own version based on the above and your own needs.
Photo gallery
Video "Cutting the carcass into 8 parts"
BOWEL
BOWEL
whom, what, choose entrails, guts or offal. Snipe is fried without gutting, they say about fish to flog, flog. Gut the pig. Gut the birds, cook. The game is gutted. They gutted the whole house, ransacked it, searched it. - Xia, suffering. Evisceration, action according to Ch. Offal husband. or many giblets and giblets, animal entrails in general, guts; but the head ones are excluded, the chest ones are rarely included, but the abdominal ones are more; pectorals are called gander, liver, root. In fish giblets there should be a liver, and in bird ones - paws, necks and heads. Offal soup. Pootrokhovins wives., pl., psk. giblets. Ripper and ripper, on gangs, a worker who guts fish.
Dahl's Explanatory Dictionary. IN AND. Dal. 1863-1866.
See what "GUTE" is in other dictionaries:
gutting, gutting, gutting, insufferable. (to gut) whom what. To clean from the insides, from offal. Gut the game. Gut the fish. Gut the chicken. || trans. Anatomize (joking). Gut the dead. "Gutting someone's dead body." A.K... Explanatory Dictionary of Ushakov
GUTE, shu, shish; shenny (yon, ena); incompatibility 1. whom (what). Cleanse offal. P. game, fish. 2. trans., what. Take out, shake out the contents (usually about the stolen; simple.). P. suitcases. P. other people's pockets. | sovereign gut, shoo, shish; ... ... Explanatory dictionary of Ozhegov
See cut 4 Dictionary of synonyms of the Russian language. Practical guide. M.: Russian language. Z. E. Alexandrova. 2011 ... Synonym dictionary
Shu, shish; gutted; shen, shena, sheno; nsv. whom what. 1. (St. Gut). To clean from the insides, from offal. P. duck. P. fish. / Shuttle. Operate. I've been gutted twice already. 2. (St. Gut). Razg. Take out, shake out the contents ... ... encyclopedic Dictionary
bowel- shu/, shi/sh; gutted; shen, shena /, sheno /; nsv. see also gutting, gutting someone that 1) a) (st. you / gutting) To clean from the insides, from the giblets ... Dictionary of many expressions
bowel- GUT OUT, nesov. (owls gutted), whom that. Remove (remove) the insides, offal from the carcass of what l. animal, bird, fish. In the evening … Big explanatory dictionary of Russian verbs
Nesov. transition 1. Remove the entrails from a dead animal. ott. trans. unfold reduced Open, dissect a corpse. 2. trans. unfold reduced To take out the contents of something for the purpose of robbery, in a hasty search for something, etc. Dictionary… … Modern explanatory dictionary of the Russian language Efremova
bowel- gut it, sh u, sh it ... Russian spelling dictionary
bowel- (II), gut /, shi / sh, sha / t ... Spelling Dictionary of the Russian Language
bowel- cut … Thieves' jargon
Books
- School of wit, or How to learn to joke, Viktor Billevich, This book will interest many - both those whom God has not endowed with wit, and those who consider themselves to be a completely witty person. A sense of humor is not some kind of cosmic insight, rather it is ... Category:
How to clean fish and how to gut fish are two of the most frequently asked questions after buying a sea yummy. Sea bass, sea bream, perch, pike perch, tench, mullet - all these varieties of fish are cleaned and gutted according to one scheme, which I will write out in detail and show on in large numbers photos. How easy it is to clean a fish, you will learn very soon. The easiest and my favorite way, of course, is to buy it where only the seller is useful for cleaning fish 🙂 In principle, cleaning fish is a service of many shops and markets, but, of course, these guys do not always know how to clean fish properly, and, unfortunately, you always run the risk of finishing it at home yourself.
This happened more than once in our family, but I was lucky: my young man is always ready to clean fish (he is from Kerch, cleaning fish is in his blood). We tried very hard to capture in detail and show all the stages of this easy, but skill-requiring business. So watch, read and remember.
So, how to clean fish from scales and from the insides. Step by step guide with photo.
How to clean fish? How to gut a fish? How to remove gills from a fish?
Many people (and I once included) are wondering how to clean the fish quickly and whether it is necessary to clean the fish at all? Of course you do. And the speed depends on how many times you will repeat this business. After a couple of attempts, it will start to turn out very easily, because this business does not require a lot of mind.
I will show you how to clean sea bass fish, but, of course, it can be dorado, perch, red fish, pike perch, and mullet. Everything that your soul desires. And I will also share in secret one cool life hack on how to properly clean fish from scales at home. Let's get started.
- How to clean fish from scales? We wash the fish, take a metal mesh for washing dishes (new) and begin to scrape off its scales under running water, moving from tail to head (the fish is cleaned from the tail). Carefully scrape with a mesh, not missing a single centimeter. This method is very easy and effective, fast and convenient, but if you are looking for an answer to the question of how to clean fish from scales with a knife, then everything is also quite simple: scrape the scales with a blade against their growth, also moving from tail to head.
- How to remove gills from a fish? The first time it can be difficult, but, in fact, there is nothing difficult in this process. We stick out the holes above the gills with our fingers and cut them with a knife on one side, as shown in the photo. This can also be done with kitchen scissors.

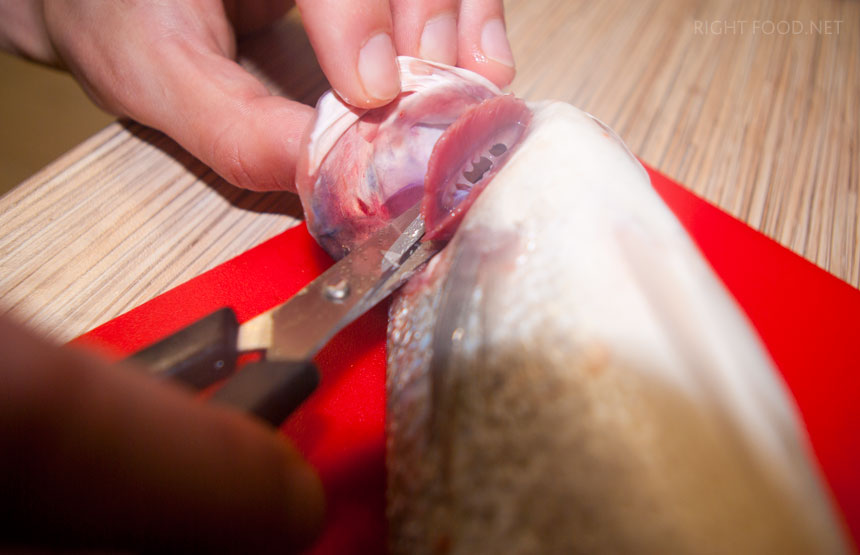
 We cut the bridle that connects the body and head.
 Cut out the last gill from the remaining side.
 We do this carefully, as you can see, there are sharp teeth on the gills, which can easily hurt you.
  If part of the gills remains or you cut the bridle first, we begin to cut the gills from the back.
 We cut them in a circle, ending with a bridle.
  We take out the cut gills from the head. Now you know how to remove the gills from a fish without harming yourself.
- How to trim the fins of a fish? We cut off the fins of the fish with a knife or scissors, as shown in the photographs.


- How to gut fish sea bass, sea bream, pike perch or any other? We put the fish on its side and cut the abdomen: we start with a small hole.

 We move towards the tail or towards the head (the latter option is more correct).
 We make a long incision, but it is better not to cut it to the very head, so the fish will retain its shape.
- How to gut a fish? We take out all the insides with our hands.


 Take a teaspoon and scrape off the remaining blackness.

- How to wash fish? We substitute the cleaned fish under running water and wash off the remains of giblets and blood.


That's all! Now you know how to clean fish from scales with a knife or a metal mesh, how to remove gills from a fish with culinary scissors, and also how to gut a fish with a teaspoon. I hope my tips, guides, photos and life hacks will be useful to you. And further! One of these days I'll tell how to fillet fish on the example of hanging and smoked mackerel.
Not to be missed , it's free! In addition, when subscribing, you will receive as a gift a collection of full-fledged recipes from 20 dishes that are prepared very quickly, from 5 to 30 minutes! Eat quickly and tasty - it's real!
Try gutting and cleaning fish at home, leave comments with ratings and remember that cooking delicious is easy enough, and that you are more talented than you can imagine! Enjoy your food!
Even a beginner can cook hot-smoked fish of the desired quality, adhering to certain rules. Therefore, to begin with, familiarize yourself with all the nuances to know some of the nuances of preparing a product for smoking.
For smoking, two types of smokehouses are used: fully or partially sealed. If we talk about hot smoking fish, then the best option- partially sealed device.
Smokehouse is better to use stainless steel. The advantages of such a device:
- maintaining a stable temperature for a long time;
- does not corrode;
- higher sealing properties.
For proper smoking of fish, the dimensions of the smokehouse are important. The height of the correct device is 50-60 cm. The device has supports to make it convenient to place over the fire. If necessary, the supports are replaced with bricks or stones.
Next, pay attention to the ways of placing the fish inside the smokehouse. There are two of them. The product is hung on hooks or placed on a metal grid. There are two grates in the set, they are placed one above the other and the distance between them is at least 15 cm. The first stand from the bottom of the smokehouse is set at least 30 cm. In this case, it will not fall on the wood chips and disturb the temperature stability. And when the chips ignite, the fish will be protected from burning. There are small holes in the tray. Hot air, passing through them, weakens and reaches the product already at the optimum temperature for hot smoking.
When smoking, it is necessary to comply with the following requirement: the smaller the dimensions of the apparatus, the weaker the heat is applied.
Should fish be gutted before smoking?
Novice smokers are concerned about the question of how to prepare fish for hot smoking - whether the carcasses are gutted before cooking or they are left untouched. The whole fish is smoked, but it is better to gut the insides. Not gutted fish gives bitterness. It is allowed to cook whole fish if the catch is small and does not exceed 0.5 kg in weight. If it is or, then weight up to 750 grams is allowed.
Evisceration of fish depends on its size:
- If the total weight does not exceed 3 kg, it is allowed not to gut. But professionals recommend getting rid of the insides during hot smoking. It is not necessary to remove the scales and cut off the head.
- Fish with a large weight are carefully cleaned. There is a danger that it will not be completely smoked, so longitudinal cuts are made on it or the carcass is divided into two parts.
After a longitudinal section, each half contains part of the head and tail. The spine is not removed and remains on one of the pieces.
Cut in another way - across. Then the knife is placed perpendicularly, and the pieces form the same size. This way, they will be able to cook evenly.
The scales do not need to be removed. Firstly, when hot smoked without scales, the fish will fall apart. Secondly, it protects the meat from soot and gives appearance attractiveness. The scales are removed if the fish is damaged.
You can also smoke hot-smoked fish in a smokehouse made from improvised materials. As a basis, take a bucket or barrel. If this is a bucket, then sawdust or hardwood shavings are placed on its bottom. The layer is approximately 2 cm. Do not forget about the twigs or juniper berries: it will give the fish an excellent smell and an appetizing look. A drip tray is placed above the sawdust. Since the smokehouse is made from improvised materials, a plate is placed in the bucket. The provision of the drip tray must not be ignored, as the dripping fat will start to burn and spoil the product.
Further along the structure of the smokehouse is a grate. It is difficult to find a round grate suitable for a bucket in the house. Therefore, we construct a lattice of branches. We take the size of the branches so as to place them in a bucket in a thrust. The finished grate is arranged at the level of the middle of the bucket. Fish prepared for smoking are placed on the branches. The pieces are laid so that they are located at a distance of 2-3 cm from each other. Then the bucket is covered tightly with a lid. Lid tightness - important condition. In order for the bucket to stand steadily, it must be placed on brick supports, and a fire should already be made between them.
Now it remains to provide a fire under a homemade smokehouse. Remember that for smoking fish in a hot way, the fire corresponds to the size of the structure. A fire that is too active will cause sawdust to ignite, and a weak one will not provide enough smoke and desired temperature inside the unit. Highly important point: do not use chips that are too dry. If there is no other, then the overdried fuel is sprayed with water, and whiskey is better. As soon as smoke appears from the bucket, we note the time allotted for smoking.
Proper hot smoking of fish is directly related to maintaining the optimum temperature in the smokehouse bucket. To do this, just put a drop of water on the lid. If the water immediately begins to hiss and evaporate quickly, the temperature in the smoker is higher than required. The bucket must be immediately removed from the fire for 15-20 minutes.
The duration of smoking depends on the amount of product and the size of the pieces, and the intensity of the fire also affects. Typically, the preparation time of the product ranges from 30 minutes to 1.5 hours. But if the fish is very small, then 20 minutes is enough.
If smoking is carried out for the first time, there is absolutely no experience in this, then they periodically look under the lid to control cooking. Just do it carefully so as not to burn yourself with hot smoke.
Safety when smoking fish
Smoking is associated with fire and hot objects, so safety rules must be observed. The precautions are as follows:
Hot smoking of fish will go smoothly if you heed the advice of experienced smokers. To properly cook hot smoked fish, adhere to the following rules:
These tips will help smoke fish flawlessly even for novice cooks. The result will please relatives and friends who have enjoyed themselves so much that hot-smoked fish will become a signature dish in the family, and cooking by smoke treatment will become a pleasant tradition.

Pike caviar has long been considered a welcome treat, not inferior even to exquisite delicacies. It is very tasty and healthy for the body.
Pike caviar, with a relatively low calorie content - 87 kcal per 100 grams of product, is a source of trace elements, including the rarest ones. The trace elements contained in caviar are of organic origin and the human body easily absorbs them without energy consumption for the breakdown and assimilation of substances. Pike caviar boasts a content of vitamin A and Omega-3. Caviar is rich in vitamin E, which detoxifies, and vitamin D, which protects and strengthens bones.
Pike caviar contains an abundance of trace elements, such as:
sulfur, chlorine, chromium, fluorine, zinc, copper, manganese, sodium, nickel, potassium.
Properly cooked caviar at home is a healthy and healing product. You can harm them only if you consume it in unlimited quantities. And it is undesirable for children under three years old to give caviar, since they are still on a milk diet. And the child's body at this age is not yet familiar with all the elements, has not learned to digest and break them down, so there may be ambiguous manifestations. And so its consumption is shown to everyone - it is very tasty and nutritious. But caviar is a perishable product and in order to preserve this delicacy, caviar should be salted. You can cope with this task yourself at home.
Caviar preparation
Starting this lesson, you need to remove your hair, and it is better to put on a dressing gown or apron. The pike is washed under running water. Caviar needs to be prepared correctly, you can’t take it and scoop it out with a spoon. It is necessary to dry the washed pike with a napkin. Then carefully cut the fish and remove the bags of caviar. Then rinse the bags and, cutting along the edge, remove the caviar from them. Care must be taken to ensure that pieces of film do not get into the eggs. Pickling masters recommend rubbing caviar through an enameled colander with a large hole diameter. Only enameled ones are suitable, not aluminum or plastic ones - their sharp cuts of the edges of the holes will cut and spoil the eggs. The next step is to rinse the caviar with boiling water. There are two ways to do this. First - put the caviar cleaned from the film in a colander with small holes and rinse with boiling water. The second way - pour water into a saucepan or basin, add salt and bring to a boil. Then the fire is turned off, and the caviar cleaned from the bags is lowered into boiling water. We mix and rinse so that there are no lumps, we recline on a sieve or a fine-grained colander and rinse with cold water.
Salting with boiling water
A quick way to salt caviar saves time and effort. Water is poured into an enameled pan, preferably without chips. Water should be taken three times more than the amount of processed caviar itself. Add black pepper, bay leaf, coriander, salt to the water. Bring to a boil, reduce heat and simmer for 20 minutes. Cleaned from the chaff and washed caviar, fill it with broth while it is still hot and through a strainer so that without peas and other spices. Stir and leave for 15-20 minutes. Next, you need to throw the caviar into a colander and let all the liquid drain, try the caviar for salt, and if not enough, then add fine-grained high-quality grinding. If additionally salted, then do not be too lazy to mix again and completely dissolve the salt. The cooled caviar is put into glass jars and closed with a dense foam rubber lid. Such caviar is stored for a month.
Note: if the caviar was overexposed or it seemed to you a bit dry, then a little vegetable oil- a few drops. This will make it crumbly, shiny, and prevent moisture loss and sticking.
Quick salting
Sometimes at a family holiday or a meeting with friends, you want to surprise with home-cured caviar. But what about those who did not have time to pickle caviar a couple of months ago?
Pike caviar can be cooked at home without the hassle and, most importantly, quickly.
Recipe one
Thoroughly rinse the caviar previously cleaned from the hymen. Allow excess water to drain and place the eggs in an enameled (without chips) or glass container. Choose dishes with a wide mouth, you will need to carefully beat the eggs. Add finely ground salt, approximately two tablespoons per 600g. caviar. We drip seven to ten drops of vegetable oil and whisk for 20 minutes with a spatula or fork. You need to watch so as not to squeeze the eggs on the sides of the dishes. Next, we remove the caviar in a glass container with a lid and put it in a cold place for 4-5 days, after which it will be ready for use.
The second version of the recipe
If time is running out, and it is desirable to bring caviar to the table today or tomorrow, then this method will save the situation. It will take more time to cook, but the caviar itself will be ready for the table in a few hours. Dip the caviar in bags into a deep bowl and pour boiling water over it, stir for 10-15 minutes over low heat, then drain into a colander and pour caviar with cold water. We shoot films. We drain the water and fill it with new, clean water. We arm ourselves with a fork and carefully beat the caviar under water - the goal is to get rid of the remnants of the hymen and make the caviar itself crumbly, cleared of mucus. We rinse three or four more times or you can under running water, the main thing is that there is no film and chaff left. Now let the water drain, wait half an hour until the caviar dries in a colander, and put it in a bowl, salt, add three drops of vegetable oil, stir gently and thoroughly - you need to completely dissolve the salt. We put it in the refrigerator for 4-6 hours, after which the delicacy is ready to eat.
📌 Read more here 👉