 Entrance
How to bake biscuits. Secrets of making biscuit dough at home
Well, what could be easier than baking a simple biscuit? Probably, many of you will not agree with me, because only experienced hostess. And in part you will be right. There are many nuances and subtleties in the preparation of classic pastries, which will be discussed in this article.
I baked my first "biscuit" at age 12, and what I got out of the oven looked more like an omelette than the cake layer I imagined. In those days there was no Internet, cooking shows and magazines with colorful step by step recipes. There was only my mother's notebook with a list of ingredients and a short description of the process. And then no one really knew how to cook it, neither my mother's friends, nor my friends, and even more so my grandmother, who is my friend only with yeast dough.
A recipe verified to the gram and understandable proportions
But in twenty years, I did learn how to bake a real biscuit, thanks to a series of experiments and personal experience. And it is this recipe that I always give to my friends and relatives, and I will also pass it on to my still little daughter.

Friends, there will be a lot of text further, so please be patient, and I promise you that your first biscuit will be lush, airy, and incredibly tasty. As you can see in the photo, the cake can be cut into three parts.
List of ingredients
- 5 eggs
- 1 cup of sugar
- 1 cup flour
- 1 pinch of salt
Additionally:
- vegetable oil for greasing the mold
- baking dish with a diameter of 28-26 cm.
- glass 250 ml.
Cooking instructions
Prepare two comfortable and deep bowls in which it will be convenient to beat with a mixer. Check that there are no drops of water in the bowl in which we will beat the whites, the bowl should not only be dry, but also fat-free. Even a fraction of a drop of fat will spoil the biscuit. Therefore, make sure in advance that the protein bowl is dry and fat-free.
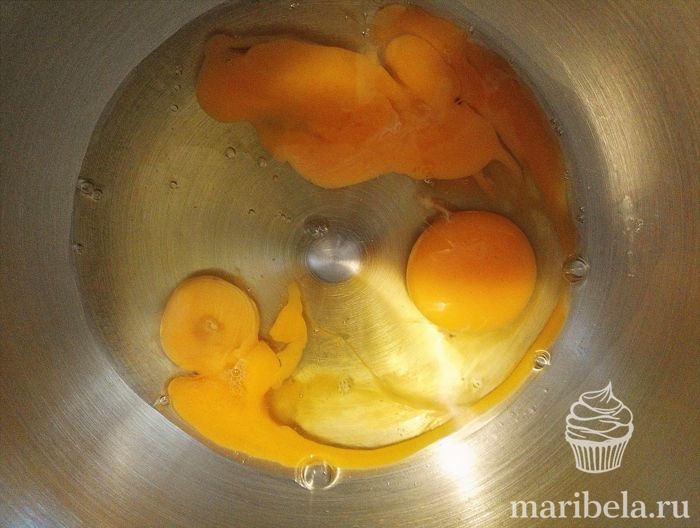
Now the most exciting part of the process: we need to separate the whites from the yolks. Carefully separate the proteins from the yolks, and make sure that even a small drop of yolk does not get into the proteins. As I wrote earlier, fat from the yolk, even in small quantities, will interfere with whipping proteins. If you are not experienced in separating the yolks from the whites, it is best to do this over a separate plate. If you spoil one protein, then the total protein mass will not suffer.
Now add half the sugar to the yolks.

Beat the yolks with sugar with a mixer until the sugar is completely dissolved, and set aside.

Cold proteins are the key to successful baking
One of the most important rules for making a biscuit is that the proteins must be cold, otherwise they simply will not whip. If you did not have time to cool the eggs in advance, then put the bowl with the separated proteins in the freezer for 10-15 minutes, where they will quickly cool. Add a pinch of salt to the chilled proteins.

Beat the whites with salt with a mixer at high speed in a lush foam. At this stage, it already becomes clear whether a biscuit will turn out or not. If the squirrels are whipped into a beautiful foamy hat, then everything is fine, we can move on. Gradually add the remaining sugar to the whipped proteins, and continue to beat the proteins until the sugar is completely dissolved.


No sudden movements!
Gradually introduce into the protein part into the yolks whipped with sugar. This must be done very carefully so that the biscuit mass does not sit down, at the lowest speed of the mixer, but it is better to stir clockwise with a spoon to be sure.

We do the same with flour, which must be sifted in advance. Add the flour to the biscuit dough one tablespoon at a time, and mix gently at the lowest speed of the mixer, or with a spoon.

"French shirt"
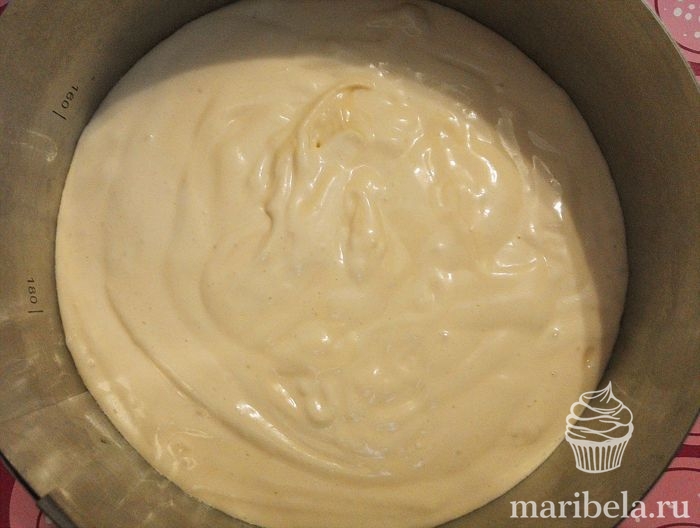
Next, let's prepare the mold for the biscuit. We don’t need surprises, so we even grease the non-stick form with vegetable oil with a brush, or with our hands, and sprinkle with flour. Excess flour must be shaken off. By the way, I just recently found out that this way of processing the form before baking is called “French shirt”.

Pour the biscuit dough into a mold, and send it to bake in a preheated oven.

How to bake in the oven
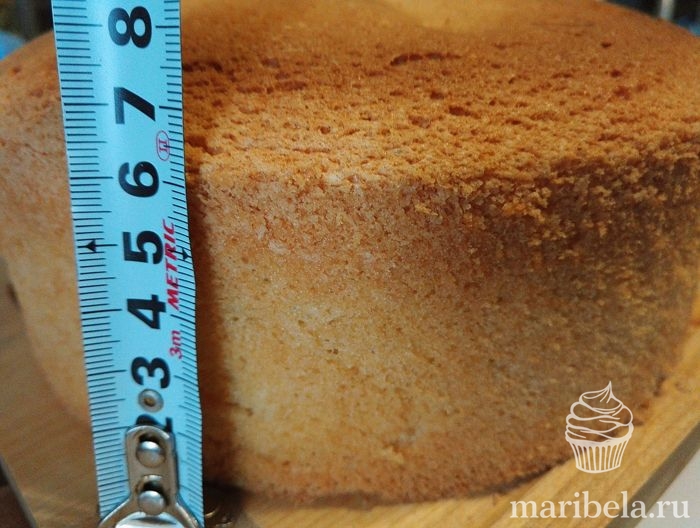
If you are cooking for the first time, then you will probably ask me at what temperature to bake a biscuit in the oven? I answer: in the case of biscuit dough, extremes are not needed, the golden mean is 170-180 degrees. Bake - 30-40 minutes. Grid position in the middle. Do not forget that you cannot open the oven for the first 25 minutes, otherwise the biscuit will not rise.
We check the readiness of baking with a wooden toothpick or skewer. If the toothpick is dry and the biscuit is browned on top, then the pastry is ready. Do not immediately remove the form from the oven, because it may fall. Turn off the oven, open the door halfway, and leave the oven to cool.

Remove from oven, unmould and transfer to a plate. After cooling, the finished biscuit falls a little, and the surface wrinkles, but still remains lush and airy.

Well, that's all my friends, I hope I didn't confuse you too much. As you can see, there is nothing complicated in preparing a classic biscuit. The main thing is to follow all the above recommendations, and you will certainly succeed.
What oven to bake biscuits in? Both electric and gas ovens are suitable for baking. In an electric baking oven, turn on the top and bottom heating without convection. Grid position in the middle. For gas oven, turn on only the lower heating, the position of the grate is also in the middle and without convection.
Which oven to put the biscuit in? For guaranteed results - perfect biscuit, the form with the dough must be placed in a preheated oven. But more than once I put the form with the dough in a cold oven, and the biscuit rose perfectly. Therefore, if you are at a crossroads to put a biscuit in a hot or cold oven, it is better to choose a hot one.
Why won't the cake rise in the oven?
Oven seal broken. This feature is typical for old Soviet ovens. Over time, the rubber seals dry out, and extraneous air enters the oven during the baking of the biscuit. If you have a modern gas or electric oven, then there is nothing to worry about.
Do not open the oven with a biscuit for the first 25 minutes. The biscuit settles in the oven if you open the oven door earlier. Set yourself an alarm, or watch through the glass as the dough rises in the form and the top browns.
Added too much flour. Flour in the dough should not be added by eye, but according to the recipe. There is a very simple proportion for a biscuit: 1 tablespoon of flour goes to 1 egg. In my recipe, this proportion is maintained: 5 tablespoons of flour are placed in a glass of 250 grams. This proportion will come in handy if you want, for example, to bake a biscuit for 7 or 9 eggs. The same proportion applies to the sugar in the recipe.
The flour was not sifted. If you are baking a biscuit for the first time, then you should not ignore this stage. Be sure to sift the flour to enrich the dough with oxygen, because classic pastries prepared without soda and baking powder, so oxygen is most welcome here.
Use of domestic eggs. The yolks in homemade eggs are always higher in fat content than in store-bought eggs, so for best result, I always bake with eggs from the store.
Recipe for a classic biscuit cake
4.8 (96.52%) 23 votesAdd recipe to favorites!
A hand-made cake is a symbol of a family holiday, home warmth and comfort. The easiest and most popular home cake made from biscuits. Biscuit dough contains a minimum available ingredients, which are in any home kitchen, it is easily whipped with a mixer, just baked. And of course, homemade biscuit cakes with homemade cream are extremely tasty. Any of the most beautiful cakes from the best pastry shops cannot compete with them. And let the homemade cake outwardly not be as beautiful and refined as the cake from professional confectioner, but when baking at home, we always make sure that we use quality products and cook with love. Here you will learn not only how to bake a biscuit for a cake, but also how and with what to soak it. I will also offer you some of the most popular biscuit recipes and give you a selection of recipes for simple and delicious creams, ganaches and icing for the cake. And of course, simple options for decorating homemade cakes with beautiful photos are waiting for you.
Biscuit Recipes
classic biscuit
The proportion of eggs, sugar and flour for a classic biscuit: for 1 egg 30 g of sugar and 30 g of flour.
- eggs 4 pcs
- sugar 120 gr
- premium wheat flour 120 gr
For a round shape with a diameter of 24-26 cm
- eggs 5 pieces
- sugar 150 gr
- premium wheat flour 150 gr
For a round shape with a diameter of 28-30 cm
- eggs 6 pcs
- sugar 180 gr
- premium wheat flour 180 gr
For a roll on a baking sheet measuring 38 cm X 32 cm
- eggs 3 pcs
- sugar 90 gr
- flour 90 gr
If in classic biscuit replace 1/3 of the flour with ground nuts or cocoa powder, you will get a nutty or chocolate biscuit respectively.
Often in the dough for a biscuit, part of the flour is replaced with starch, it is believed that with it the product will turn out to be more airy and tender, since it reduces the amount of gluten. But I do not advise and never add myself. And to reduce the effect of gluten, just quickly stir the flour into the eggs.
Beat eggs until foamy for 7-8 minutes. Gradually add sugar, beat for at least 10-15 minutes until fluffy and increase in volume by 2.5-3 times and the sugar is completely dissolved. Sift the flour into the beaten eggs in 2-3 additions, mix with a spoon or spatula. Make sure that all the flour interferes with the dough. Pour the dough into a mold, the bottom of which is covered with baking paper, the sides do not need to be oiled. Bake in a preheated oven at t 180 ° C for 35-40 minutes.
The classic biscuit is very fluffy, delicate and airy. In my opinion, it is good even on its own without impregnation and cream, just sprinkle powdered sugar.
Detailed step by step photo recipe cooking ⇒
butter biscuit
For one round mold 26-28 cm in diameter or two molds 20 cm in diameter
This amount of dough can also be baked in a 24 cm diameter pan, place the excess in muffin molds and bake with the main biscuit.
- eggs 6 pcs
- sugar 165 gr
- premium wheat flour 150 gr
- butter 75 gr
- baking powder 1 tsp
Melt the butter, you can microwave oven.
Beat eggs until foamy, 7-8 minutes.
Gradually add sugar, beat until volume increases, 10-15 minutes. Add flour with baking powder to beaten eggs in 3-4 additions - sift directly into the eggs. Stir gently with a spoon or spatula from bottom to top and towards the middle. Make sure that all the flour interferes with the dough.
Add 2-3 tbsp to melted and slightly cooled butter. biscuit mass, mix and then add to the total mass in 2-3 doses, mix gently. Make sure that all the oil is evenly mixed into the dough.
Bake the sponge cake in a preheated oven at 160°C for 40-45 minutes.
More biscuit baking tips at the bottom of the page.
Detailed step by step photo recipe ⇒
Angel Biscuit
For a round mold with a diameter of 20 cm
- eggs (whites) 6 pcs
- pinch of salt
- flour 65 gr
- baking powder dough 1 tsp.
- sugar 125 gr
- vanilla sugar 1 tsp
- lemon zest from 1-2 tsp
It is not necessary to use the freshest proteins, on the contrary, it is better to use “aged” ones, that is, those that have stood in the refrigerator in a hermetically sealed container for 3-5 days. You can also use thawed proteins.
Carefully separate the whites from the yolks so that not a single drop of the yolk gets into the whites. Add salt to the protein mass and beat until a fluffy and soft white foam is obtained. Continue whisking while adding in small portions a mixture of plain and vanilla sugar. Beat until a stable mass is obtained.
Remove the zest from the lemon by rubbing on a fine grater (remove only a thin yellow layer, without affecting the bitter white part), add to the proteins. Sift flour with baking powder, add (sift) to the protein mass in 3-4 steps, gently knead from the bottom up and to the middle. Do not allow too intense or rough movements, otherwise the delicate air mass may settle! Put the protein dough in a dry form (we do not lubricate the walls with anything), level the surface. Bake in a preheated oven t 180 ° C for 35-40 minutes.
More biscuit baking tips at the bottom of the page.
You can cook from yolks, which can be stored in the refrigerator for up to 2 weeks or cook very tasty
orange biscuit
Similarly, you can make a lemon biscuit by replacing the orange with 2 lemons.
- eggs 4 pcs
- sugar 130 gr
- flour 160 gr
- starch 40 gr
- 1 large orange (zest and 80 ml juice)
- baking powder 6 gr
Remove the zest from the orange and squeeze out the juice. Mix flour, starch and baking powder - sift. Beat eggs until foamy for 7-8 minutes. Gradually add sugar, beat for at least 10-15 minutes until fluffy and increase in volume by 2.5-3 times and the sugar is completely dissolved. heat up Orange juice to a boil. Add to egg mixture orange peel and sift the flour mixture into the beaten eggs in 2-3 doses, mix with a spoon or spatula. Make sure that all the flour interferes with the dough. Stir orange juice into the batter. Bake in a preheated oven at 180°C for 30-35 minutes.
More biscuit baking tips at the bottom of the page.
chocolate biscuit
For a round shape with a diameter of 24 cm
For chocolate mass:
- cocoa powder 30 gr
- sugar 200 gr
- odorless vegetable oil 135 gr
- water 100 ml
For the biscuit:
- eggs 5 pcs
- sugar 50 gr
- premium wheat flour 200 gr
- baking powder 1 tsp
- salt 0.5 tsp
Cook the chocolate mass: combine cocoa powder and sugar in a small saucepan, add water and vegetable oil - bring to a boil with constant stirring.
Mix dry ingredients: flour, baking powder, salt - mix with a spoon and sift.
Beat eggs with sugar until white and double in volume.
Add the chocolate mass to the beaten eggs in 3-4 additions, continue beating.
Add the flour mixture in 2-3 additions (sift into the dough), mix well with a spoon. At the end, you can punch a little with a mixer.
Bake in a preheated oven t 180 ° C for 45-50 minutes.
More biscuit baking tips at the bottom of the page.
Chocolate biscuit (lean)
For a round shape with a diameter of 20-22 cm
(glass volume 200 ml)
- flour 2 cups
- cocoa powder 2 tbsp
- sugar 1 cup
- vegetable oil (refined) 4 tbsp.
- baking powder 2.5 tsp
- vanilla sugar 2 tsp
- water 1.5 cups
Combine dry ingredients: sift flour with cocoa powder and baking powder, add vanilla and regular sugar, mix. Gradually add water, stirring well. The dough should be smooth, viscous and homogeneous, evenly colored in chocolate color. Add vegetable oil, mix thoroughly. Bake in a preheated oven t 180 ° C for 30-40 minutes.
More biscuit baking tips at the bottom of the page.
Unsweetened chocolate in recipes can be replaced with cocoa powder, according to the following scheme:
every 30 grams of chocolate = 1 tbsp. l. butter + 3 tbsp. l. cocoa (no slide). The reverse substitution is also possible if we want to replace cocoa with chocolate.
Biscuit Impregnation Recipe
Basic recipe for impregnation
So that the cake is not dry and at the same time, so that your biscuit does not float in a puddle of syrup, you need to correctly calculate the amount of impregnation. Remember the proportion: for a biscuit weighing 500 grams, you will need 250 - 300 grams of impregnation.
- water 3 tbsp.
- sugar 2 tbsp
- 1 tbsp cognac
From this amount, 100 ml of syrup is obtained.
Heat water, add sugar, heat and stir to dissolve sugar. Once all the sweet crystals have dissolved, leave the syrup alone and wait until it boils. Remove the foam that has formed on the surface and remove the saucepan from the stove. Add alcohol to the cooled syrup: cognac, whiskey, rum.
To sugar syrup you can add vanilla, cinnamon.
Water can be replaced with coffee.
For baby cake water can be replaced with fruit juice, do not add alcohol. You can also prepare milk impregnation for children: dilute condensed milk with boiling water to the desired consistency, add vanilla or cinnamon.
You can use any ready-made syrups (my favorite is almond - it harmonizes perfectly with chocolate biscuits). Syrup from homemade jam is also suitable (if it is very thick, dilute it with a little water). Often for impregnation I use homemade
We also add alcohol to ready-made syrups.
Cake Cream Recipes
Cream with Mascarpone and cream
- Mascarpone cheese 250 gr
- cream not less than 33% 250 ml
- powdered sugar 4 tbsp
Whip cream with powdered sugar. Stir the mascarpone with a spoon, gradually add the cream into it. Add vanilla. Whisk.
Cream with Mascarpone and butter
- Mascarpone cheese 500 gr
- butter 82% 100 gr
- powdered sugar 200 gr
Beat butter and sugar until light in color, 3-5 minutes. Add Mascarpone and beat again until smooth.
More tips for making creams at the bottom of the page.
Cream with boiled condensed milk and butter
- boiled condensed milk 2 cans
- butter 82% 2 packs
Butter room temperature mix with a spoon with boiled condensed milk until smooth, beat lightly.
More tips for making creams at the bottom of the page.
Custard
- milk 0.5 l
- cornstarch 3 tbsp. l. (or flour)
- eggs 1 pc
- sugar 150-200 gr
- vanilla sugar 1 sachet
- zest of one lemon (optional)
- butter 82.5% 180 - 200 gr
- powdered sugar 1-2 tbsp
Beat starch, sugar, vanilla sugar, salt, egg and a small amount of milk with a blender until smooth. Add remaining milk, stir. Bring to a boil with constant stirring. Try to get a homogeneous mass. Pour the cream into a bowl, cover with a film "in contact", cool. Beat the butter with powdered sugar until white, gradually add the custard base to it in 3-4 steps, beat well.
More tips for making creams at the bottom of the page.
lemon cream
Similarly, you can cook orange cream replacing the lemon with an orange.
- lemon juice 90 ml
- butter 150 gr
- eggs 3 pcs
- lemon zest 1 tbsp. a spoon
- sugar 150 gr
Combine in a heavy bottomed saucepan lemon juice, zest, sugar and eggs, mix until smooth. Place over low heat and, stirring constantly, bring to a boil and thicken slightly. Cool the resulting curd completely. Beat soft butter until fluffy. Continuing to beat, gradually introduce the cooled curd.
More tips for making creams at the bottom of the page.
Cream with Nutella
- Mascarpone cheese 250 gr
- cream not less than 33% 250 ml
- powdered sugar 4 tbsp
- Nutella 250 gr
Whip cream with powdered sugar. Stir the mascarpone with a spoon, gradually add the cream into it. Add Nutella. Whisk.
More tips for making creams at the bottom of the page.
Chocolate cream with chocolate
- butter 300 gr
- chocolate 170 gr
- sugar 150 gr (powdered sugar is better)
- vanilla extract 1 tsp (or vanilla sugar 1 sachet)
- hot coffee 1-2 tbsp.
Beat room temperature butter with sugar until white. Heat the chocolate in a steam bath, gradually add it to the butter in small portions, beat. Whisking constantly, add hot coffee.
More tips for making creams at the bottom of the page.
Chocolate cream with cocoa powder
- butter 100 gr
- milk 100 ml
- sugar 1 cup (200 ml)
- cocoa powder 2 tbsp. l.
- wheat flour 2 tbsp. l.
- cognac 1 tbsp (can be excluded)
Melt the butter, being careful not to burn. Mix sugar, cocoa powder and flour, add to melted butter, mix until smooth. Gradually add milk and cook with constant stirring until thickened. Cool down. Add cognac.
More tips for making creams at the bottom of the page.
Ganache and cake icing recipes
Ganache or icing cover the top of the cake. With their help, you can make beautiful smudges on the sides of the cake. To ensure that the ganache or icing covers the cake evenly, when forming the cake, place the bottom of the biscuit on top, which was in contact with the bottom of the mold.
Ganache with dark chocolate
- dark chocolate (70%) - 100 gr
- cream (33%) - 50 ml
- butter - 10-15 gr
Break the chocolate into pieces and place in a bowl. Bring the cream to a boil and pour over the broken chocolate. Stir until the chocolate is completely melted. Let cool, add butter, mix - you should get a smooth and shiny ganache.
Ganache with white chocolate
- white chocolate 200 gr
- cream 33% 100 ml
- butter 10 gr
Break the chocolate into pieces, add boiling cream, stir until smooth and chill in the refrigerator for 2-3 hours, if necessary, you can leave it overnight. Take out the yellowish mass and start beating it with a mixer. In the process of whipping, add butter - it is necessary for shine and a more delicate texture of the cream. After this manipulation, the ganache will thicken, turn white and be ready to use.
Ganache with cocoa powder
- milk 170 ml
- cocoa powder 4 tbsp
- sugar 5 tbsp
- butter 100 gr
Pour milk into a saucepan and bring it to a boil. Add sugar mixed with cocoa powder. Cook the ganache over medium heat, stirring constantly, until the sugar is completely dissolved. Remove from heat and add oil. Stir to dissolve the oil. Cool.
Chocolate glaze
- bitter chocolate 100 gr
- butter 60 gr
Combine chocolate pieces and butter together, heat in a water bath until smooth.
Chocolate glaze (lean)
- vegetable oil (refined) 1 tbsp. l.
- sugar 2 tbsp. l.
- cocoa powder 3 tbsp. l. without a slide
- water 40 ml
Combine cocoa powder, vegetable oil, sugar. Add water and, stirring, bring to a boil. Cook over low heat for 2-3 minutes. Let the frosting cool slightly and pour over the cake.
lemon glaze
- powdered sugar 2/3 cup
- lemon juice 1.5 - 2 tbsp.
Squeeze the juice from the lemon and be sure to sift the powdered sugar - wipe through a strainer so that there are no lumps. Gradually add the juice to the powder, stir until a homogeneous thick mass. If the icing turns out to be very liquid, add powdered sugar to it, if it is thick, add juice or water.
Jelly to cover fruit on cake
- gelatin 10 gr
- 0.5 cup water 100 ml
- lemon juice 1 tsp
- sugar 1 tbsp
Pour gelatin into cold water. When the gelatin swells, heat the mass until the gelatin is completely dissolved. Do not allow boiling, because. gelatin will lose its strength.
Add sugar and lemon juice. Cool down a bit. Apply the jelly to the fruit with a brush. The gelatin will harden and the fruit will retain its freshness.
How to make biscuit dough
♦ Eggs
eggs for biscuit dough must be fresh and at room temperature.
If you forgot to take the eggs out of the fridge ahead of time, put them in a bowl of warm water t 40 ° - 50 ° C for 3-5 minutes.
Usually eggs whip up whole, without separating the whites from the yolks, but separation is possible in some recipes.
Eggs whipped first at high speed for at least 7-8 minutes. And then gradually introduce sugar in small portions and beat for at least 10-15 minutes until splendor and increase in volume by 2.5-3 times, and complete dissolution of sugar. You can determine the readiness of the beaten egg mass by the traces of the whisk of the mixer, which will form on the mass when it reaches the desired consistency - you can draw on the surface with the biscuit mass and the trace of the dough remains visible for several seconds.
♦ Flour
Flour for biscuit be sure to sift along with baking powder, starch, cocoa or vanilla, if they are added according to the recipe. By sifting flour, we enrich it with oxygen, it becomes softer and more airy, it is easier to mix with beaten eggs.
After introducing the flour into the eggs, mix it with a whisk, spatula or spoon from the bottom up in a circle. You should not do this for a long time, because. with long kneading, gluten develops in the dough, and this is badly reflected in the splendor of the biscuit. Do not use a mixer when mixing flour, it can precipitate the mass, the cake will turn out low, dense, heavy. Watch for thorough mixing, because. flour easily hides in the folds of a dense egg mass or settles to the bottom.
♦ Oil
If butter is added to the biscuit, then it must be pre-melt and cool slightly, then add 2-3 tablespoons of biscuit mass to it, mix well, and only then combine with the rest of the dough. If you immediately pour oil into the dough, it may fall off.
This is what it looks like ready dough for biscuit.
How to bake a biscuit
For baking biscuits, it is best to use detachable round shape with non-stick coating. It is good because it does not need to be lubricated with oil, just cover the bottom with baking paper.
If you don't have baking paper or parchment, line the bottom of the pan with a piece of regular white sheet, brushing it with a drop of oil.
One-piece shape with conventional coating brush with butter and sprinkle with flour (French shirt).
Silicone forms for baking, grease with odorless vegetable oil only before the first baking. In the future, high-quality silicone does not require lubrication - this is recommended by manufacturers. But I advise oiling and flouring the bottom of the mold.
The biscuit feels great in a cake pan with a hole in both silicone and metal. Such a biscuit can be quickly baked and served on the table, sprinkled with powdered sugar or sprinkled with chocolate or lemon icing.
Fill the baking dish 3/4 full because The finished biscuit will rise a lot during baking. In a detachable form, it is easy to navigate by internal rivets - the dough should reach the top rivet.
If there is more biscuit dough than will fit in the mold, place it in the muffin molds and bake with the main biscuit.
Turn the form with the dough around the axis, without lifting it from the surface of the table - so the dough is evenly distributed over the form.
Biscuit dough must be put in the oven immediately after cooking, otherwise it will become dense.
Bake the biscuit in a preheated oven in top-bottom mode without blowing mode (convection). The form should stand on the middle shelf of the oven.
Usually the biscuit is baked at t 180°C But it is better after the biscuit has risen in the oven and slightly taken on a crust, lower the temperature to t 160 ° C and bake until cooked at this temperature.
Do not open the oven until the end of baking. In any case, the first 15-20 minutes, otherwise the cake may settle. But, if it is necessary, for example, to take out a biscuit in small muffin forms - in them it will bake faster than in a large form - we open it briefly and very carefully, do not slam the oven door.
If the top of the biscuit browns too quickly-Cover it with baking paper or foil. A strong crust can interfere with the evaporation of moisture, the cake will remain unbaked, wet in the middle.
Check the readiness of the biscuit with a wooden skewer. or a toothpick inserted in the center - it should be dry.
Let the biscuit cool in the form - put it on a wire rack, turning it upside down so that the middle does not sag. If you don't have a special rack for cooling the biscuit, you can use a microwave oven rack or place a 4-cup mold - it is important that there is air between the biscuit and the surface.
When the biscuit has cooled, run a knife between the biscuit and the side of the form, open the form and turn the biscuit on a wire rack, remove the paper.
shape the cake(cut the biscuit and soak it) only when the biscuit has cooled down well(from 5 to 10 hours). You can bake a sponge cake in advance, a day or two before the formation of the cake. For storage, the cooled finished biscuit is wrapped in cling film.
How to cut a biscuit
You can cut the biscuit cake into layers a knife or a special biscuit divider only after it has cooled well - at least 4 hours, and if you soak, then 8 hours.
Very simple cut the biscuit with fishing line or dental floss: make cut-marks on the sides of the cake, insert the fishing line, cross in front of you and pull in different directions, keeping the ends parallel.
How to soak a biscuit
The syrup transforms a rather dry biscuit in the basic variation, making it more moist and tender. This is just a godsend for young housewives or those who do not have enough time for culinary delights. Indeed, with the help of different syrups, it is possible to create new, dissimilar works of confectionery art from the same cakes.
Various syrups are used to impregnate biscuits, fruit juices and sweet sauces. For a cake that you offer to adults, the impregnation may include alcoholic drinks. Alcohol is not added to children's cakes.
The cut biscuit is impregnated with cold impregnation with a brush or watered with a spoon, starting from the edges of the biscuit and moving towards the center. Wait until the syrup is absorbed and repeat the soaking if you feel that the cake is not soaked enough.
The amount of syrup varies depending on taste - someone likes a drier, only slightly flavored cake, and someone likes it moist and even wet from impregnation.
A tall biscuit can be soaked with a syringe. To do this, you need to draw syrup into a syringe and inject it into the biscuit with a thin needle, trying to evenly distribute the liquid in the biscuit cake.
How to make cream cake
The most popular biscuit cream made from mascarpone cheese and whipped cream or butter.
In order for the cream to whip well, it must be cold, it is advisable to cool the dishes in which you will whip them, and the whisks of the mixer. Properly whipped cream should retain its shape, and not spread into a cake. However, don't overdo it. Whipping the cream too long can end up with whey and butter instead of whipped cream.
It is important to add whipped cream in small portions in Mascarpone, and not vice versa!
The average whipping time for 33% Petmolovsky cream is 5 minutes, for 38% Valio - 1-2 minutes.
Cream with Mascarpone and butter will turn out to be more dense and stable, it is good to use it not only for cakes, but also to decorate cupcakes.
Pictured are biscuit dough cupcakes baked in a muffin tin with Mascarpone cream and butter.
Another tasty and affordable Cream for biscuit made from butter and boiled condensed milk. Its preparation does not require a mixer: mix room temperature butter with boiled condensed milk until smooth, beat lightly.
Advice:if condensed milk does not mix well with oil, put the cream in a container with hot water and keep stirring. As soon as the cream begins to mix well, remove it from the hot water so as not to overheat.
I advise you to cook condensed milk at home, because. finished product from the supermarket contains Palm oil and other unhealthy ingredients.
You can cook only natural high-quality condensed milk, prepared in accordance with GOST R 53436 - 2009 delicious treat, buy condensed milk with a fat content of at least 8-8.5%. The jar should say "whole sweetened condensed milk". Do not attempt to brew condensed milk produced to specifications (manufacturer's specifications). Such condensed milk contains vegetable fats, and when cooked, they do not thicken.
How to cook boiled condensed milk
Place a closed (sealed) jar of condensed milk in a saucepan, fill with water so that it covers the jar by 3-4 cm, bring to a boil and cook over low heat for 2-3 hours. Make sure that the water does not boil away, if necessary, add boiling water to the pan. Do not add cold water, a can of condensed milk may explode. When the condensed milk is cooked, cool it. Thus, you will have a wonderful natural product. This can be done in advance, a few days before the dessert is prepared.
You can apply the cream on a biscuit at home with a spoon, leveling it with a knife or a pastry spatula (a spatula with a heel).
How to decorate a homemade cake
The issue of decorating a cake is primarily a matter of a sense of proportion. You can use a cream bag, nozzle sets and produce a lot of roses, leaves, borders and other beauty, but if you do not have sufficient skills, such decoration will look sloppy and primitive. Therefore, I advise the most simple ways decorations - sprinkle the cake with biscuit crumbs, chopped nuts or grated chocolate. This is how my grandmother decorated the cake and here about it in detail ⇒
Another option is to decorate the cake with meringue crumbs. Meringue (meringue) can be bought at a pastry shop, or you can bake at home ⇒
Cream of Mascarpone and boiled condensed milk. It is prepared in the same way as Cream of butter and boiled condensed milk.
beautiful and tasty decoration cake are fresh fruits. The only downside to this decoration is that the fruits dry out quickly, so decorate the cake just before serving or cover it with clear jelly (recipe above).
And this one Chocolate cake decorated, which are easy to prepare at home. Pay attention to the coating of the cake - this style is now very popular and is called “naked cake” (in Russian “naked cake”), i.e. a cake covered with only a thin layer of cream through which the sides of the biscuit shine through.
An easy way to give your cake a festive touch is to decorate with fresh edible flowers. This should be done before serving and, of course, use flowers grown without chemical fertilizers.
The photo is decorated with a strawberry flower and mint leaves. This option is also suitable for decorating a cake.
Fresh flowers that can be eaten: rose, orchid, calendula, nasturtium, cornflower, chamomile, dandelion, clover, lilac, violet, pansies, sunflower, acacia, lavender, geranium, jasmine, hibiscus, elderberry. Flowers of edible berries and fruit trees: citrus, apricot, peach, apple, cherry, pumpkin, zucchini. Mint leaves, lemon balm, basil.
While these flowers are edible, you don't have to eat them if you don't feel like it. Having admired enough beautiful cake you can just put them aside.

I tried to collect for you the most affordable and at the same time various recipes biscuits, creams and ganaches, shared the secrets of their preparation - I think, sufficient material for home improvisations. Bake cakes at home, friends! Let them turn out to be not very even, not very beautiful and will not delight in the luxury of decoration, home kitchen more than compensates for all this with the love and joy that you give to your family. I wish your families to be friendly and happy, may they have many children, a lot of fuss and worries. And let your families be big, because in small families, as a rule, cakes are not baked.
Today we offer classic recipe fluffy biscuit, which is suitable for making various cakes and other desserts. There is no soda or baking powder here - the dough rises well due to proteins whipped into an “airy”, strong mass.
Such a biscuit can be divided into 2 or 3 cakes and smeared with any sweet cream, or cut into cubes and used in the formation of cakes like "". The biscuit is very soft, tender and tasty. However, there are some nuances in the cooking process, which we will discuss below.
Ingredients: 
- eggs - 6 pcs.;
- sugar - 200 g;
- flour - 160 g;
- vanilla sugar - 1 sachet (10-12 g);
- butter (for greasing the mold) - 5-10 g.
Classic biscuit recipe with step by step photos
How to make biscuit dough
- Carefully separate the whites from the yolks and place in a clean and dry bowl. Beat at the minimum speed of the mixer until a light white foam is obtained. It is important that not a drop of yolk gets into the protein mass, otherwise it will not work to beat the proteins to the desired consistency. Also pay attention to the cleanliness of the bowl used so that there are no traces of grease or any specks on it. For safety, you can pre-wipe the bowl with a paper towel lightly moistened with lemon juice.

- Continuing to work with a mixer, gradually add half the sugar norm. We increase the speed of revolutions and be sure to beat the mass until “stable peaks” form. That is, if you tilt the bowl, the proteins remain motionless. This step in the cooking process is extremely important: if the whites are not beaten thoroughly enough, the biscuit will not turn out fluffy.

- Mix yolks with leftovers granulated sugar and vanilla sugar. Stir vigorously until smooth. You can work with a whisk, a regular fork or a mixer, but in any case, you need to get a mass of a light shade that has significantly increased in volume.

- We spread about 1/3 of the proteins to the yolk mass and gently mix with movements from the bottom up. Be sure to sift the flour, and then add to the egg mixture. We continue to knead the mass from the bottom up until a homogeneous composition is obtained without flour lumps.

- Next, lay out the remaining proteins and mix with the same movements from the bottom up until the components are combined into a smooth, fluffy mass (do not stir the biscuit dough in a circle, this may cause it to settle).

How to bake a biscuit so that it turns out magnificent and does not fall off
- We take a small detachable baking dish, with a diameter of no more than 22 cm (if you use a larger form, the biscuit will turn out thin). We cover the bottom with oiled parchment, and grease the walls of the form from the inside with a small piece of butter. We fill the form with the prepared dough. During the baking process, the biscuit will noticeably “grow up”, so the form should be filled with dough no more than 2/3.

- We send the form to the oven preheated to 180 degrees. Bake for about 30-40 minutes (depending on your oven). In order for the biscuit to turn out lush and not to settle, during the baking process we try not to slam the oven door, and for the first 20 minutes it is better not to open it at all. When the dough rises and is slightly browned, we lower the temperature a little so that our biscuit does not burn and is well baked inside. We check the readiness with a toothpick, immersing it in the center of the biscuit. If the stick remains dry, then the biscuit is completely ready. Do not forget that the biscuit can fall off from a sharp temperature drop, so leave it in the oven turned off with the door ajar until it cools completely.

- Carefully remove the detachable board from the cooled biscuit. We first pass the knife blade along the edge of the form. We cover the biscuit with a napkin and leave it at room temperature for 8-10 hours before forming the cake (the “rested” biscuit will not soak much from impregnation and crumble when cut into cakes).

In our recipe, we tried to describe in detail all the subtleties and nuances in the manufacture of a classic magnificent biscuit, but if it suddenly fell out of your favor - do not worry! Under a layer of cream, it will be almost imperceptible, and as a workout, just practice baking a biscuit more often. This process requires skill and culinary experience, and much also depends on the characteristics of a particular oven. Here everything is known only through trial and error! Good luck!
I already wrote once that I don’t like the usual biscuit, which contains only flour, sugar and eggs. It reminds me of scrambled eggs, with its bright aroma. So I kept looking for other options. And if I decided on a chocolate biscuit almost immediately (more precisely, I have 3 options in my favorites, each is good in its own way - this is, and all links are active, click on the desired line and you will be taken to the page with the recipe). Then things were worse with ordinary vanilla, it seems that good recipe- but there it is necessary to carefully separate the proteins from the yolks, beat it all separately, and then mix very carefully. In general, an option that you have to tinker with, and beginners may not succeed with it (although the result is also good, be sure to try it too, maybe you will like it more).
This same recipe for beginners is just a godsend! It will save you not only time, but also your nerves) There is no need to separate the yolks from the proteins, the eggs are beaten whole, and you don’t have to wash a mountain of dishes, since everything can be done in two containers.
So, how to make a simple vanilla biscuit for a cake at home, a recipe with a photo step by step.
Ingredients for a 18-20 cm mold:
- 4 eggs of the first grade (I have 3 large ones here)
- 180 gr. Sahara
- 170 gr. flour
- sachet of vanilla sugar
- 1 tsp baking powder
- 3 tbsp vegetable oil(any odorless will do)
- 3 tbsp boiling water
Cooking:
All ingredients must be at room temperature. We place the eggs in the mixer bowl and beat at high speed for about 5 minutes. The mass will noticeably increase in volume and brighten.
Then, without stopping whipping, add sugar there in 3 passes, each time taking a break for a minute so that the previous portion has time to dissolve.

After all the sugar has been put in, beat for another 5 minutes. The mass should increase well in volume and keep its shape well.
While eggs are beating, mix flour and baking powder.

Whipped egg mass sift the flour and gently folding movements mix with a silicone spatula, trying to keep all the splendor of the eggs. The dough will be thick at this point, don't worry, it should be.


Pour into prepared form. I have a split ring, I laid the bottom with foil and clamped it tightly so that the dough does not run away. I do not lubricate the side with anything. At the bottom of the form, if you do not have a ring, lay baking paper.
We send our mold to a preheated oven and bake at 180º for 30-40 minutes. From 20 minutes you can check readiness, all ovens are different, be guided by a dry match! It usually takes me 37 minutes.

The finished biscuit must be turned upside down without taking it out of the mold, laying 2-3 cans for support. In this state, it should hang for 10-15 minutes, thanks to which it will not settle.

After 15 minutes, the biscuit can be removed from the mold. My advice is to immediately wrap it in cling film and put it in the refrigerator without waiting for it to cool completely. So, all the liquid will remain inside the biscuit and it will become much juicier. The cake should reach the desired consistency in the refrigerator, it takes 6-8 hours, but it is better to leave it there overnight.

After this time, we take it out and cut it into the number of cakes we need. I ended up cutting it into 4 pieces. Look how soft and fluffy it is inside.

Here is such a tall handsome man obtained according to this recipe. In total, from 4 eggs (in my case, from 3), we got a cake almost 7 cm high in a volume of 19 centimeters.
And this is how it looked in the cake. Due to the presence of oil and boiling water in the composition, such a biscuit requires a minimum of impregnation. It turns out a thin crust, which can not be cut off.

This cake had “3 milk” impregnation (recipes are active via links) and bananas in a layer (next time I would replace it with for completeness of taste). The cake turned out to be very tender and light, the vanilla biscuit itself is weightless, and in addition to such a light cream (without butter), the cake is simply heaven for those who are tired of fatty, oily desserts.
If you want to bake a biscuit in the form of a different size, then in this article I wrote in detail how to count all the ingredients -.
Enjoy your meal.